

A new Ancient system played with wargaming buddy Andrew Tuesday night.
"To Ur is Human" rules, advertised as being "written specifically for games set in the period of the Mesopotamian city-states, such as Akkad and Ur. Using a gridded playing area and easy to learn innovative rules".
There is an excellent summary here on Palouse Wargaming Journal detailing some core mechanics, so I won't bother repeating these points. I purchased the rules for $10 NZ from Wargame Vault and printed and bound them. I think Andrew said he ordered a printed copy which still hasn't arrived given postage timeframes to New Zealand. The other book is just some recommended reading on the period!

A question that might be asked is why you would need another ancient's rule system, and the answer is we don't. E.g. here is the the same period we played with Big Battle DBA rules.
At the same time, it is interesting to see different takes on wargaming, and especially for a narrower period. The design philosophy of these rules places an emphasis upon several features of warfare at this time that might be particularly characteristic, and significantly obfuscated/abstracted in other more generic rules. The characteristics are based upon the best interpretations we can make given our limitations in understanding these first human civilisations of course.
Features focused upon include (1) the core mechanic whereby troops are in a state of fight/fright/flight, (2) the potentially devastating effect of "Battle Carts" (both combat effect and movement), and (3) the generally ponderous nature of armies more generally.
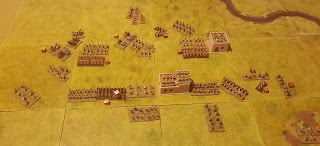
All figures and terrain (apart from two buildings!) are Andrews. We played on a grid where each 25cm tile was effectively 9 squares (easy to see position at a glance). So the grid was 15x 9 squares, with 12x8 recommended as minimum for decent sized game. Grid movement adds some clarity to the game, though we also had a few questions about it at times (see below).

On with the game. Here we see my light troops running up to target the enemy before retiring.


Any unit when charging or charged makes a fear test which may result in units being in a fight, fright or flight state, with effects which might be expected from those results. For example Battle Carts have a reasonable chance of "frighting" or "flighting" other troops even if they don't close.

As can be seen though, it has become a mess, with my battlecarts having swung around behind and through the enemy army and coming back out the other side.


The carnage is heavy, but my forces break first.


On the right, a last archer fights to the death against some enemy medium infantry, as I send troops to reinforce. The enemy medium infantry have taken very heavy casualties from shooting. Shooting is rather deadly to many troops in this period given the lack of armour or shields!


Disaster as my "Big Man" accompanies my unshielded spearmen and is killed against enemy shielded spearmen (who were in a fright state encouraging some aggression on my part).. Shields are the new superweapon of 3000BC, exceeded in fearsomeness only by the mighty Equid (donkey) drawn carts of death.


I won't say too much more except we enjoyed the basic concepts, especially the fight/fright/flight mechanic, whereby troops are often having an effect without fighting (e.g. Battle Carts thundering around shaking morale), and shaken troops add to the confusion and mess.
A few things we were unclear on:
- Big Men allow rerolls, but of what? Combat dice, fear tests? Everything? Rerolling 12 combat dice (for example) seems very powerful, when you are already adding extra dice for the Big Man.
- Retreats - this caused the most confusion, it wasn't clear where units should have to retreat to, especially in multiple combats. What about if you are in flight state where do you run? Is it to the nearest board edge? Some greater specification here would seem useful, e.g. retreat directly backwards from frontal enemy, then towards board edge subsequently, which is what we ended up doing.
- Do you have to keep testing morale if you are in fright/flight state or is it optional?
- Light troops and when they can shoot was a bit confusing, if they test fear and shoot before retreating, do they get to do anything in their own turn, or do they just have to sit there a turn? We think they can't do anything at this point.
- Chargers from a diagonal, e.g. from rear/flank, do they hit flank or rear?
In terms of modifications we might be implement, troops seem rather inclined to stay to the last man at times, and we would be tempted to remove a unit if it drops to a single stand, not least because this makes it impossible to indicate if it is in fright or flight without use of counters otherwise. An exception would be made for battlecarts which are only two stands, and also limited in number and easier to remember the status of!
Anyway some neat concepts in this ruleset and recommend giving it a go if this is a period you are interested in! We are playing again next week.


0 Comments